
Smyrna Wood Flooring handles hardwood floor water damage in Smyrna, GA with more than 20 years behind us, serving surrounding cities including Vinings, Fair Oaks, Mableton, Marietta and Austell. When a washer hose splits, a dishwasher leaks under the cabinet, a supply line gives way or a storm pushes water through a door, we trace where it went, dry and measure the floor, and replace only the boards that stay damaged once the wood is dry again.
Water damage on wood floors is misleading on day one. Boards that cup badly in the first week often flatten again once they dry, while boards that look fine can be soaked underneath and fail months later. The only reliable guide is a moisture meter, used across the whole affected area and repeated as the floor dries.
That is why we do not quote a replacement from the first look. We map the wet area, dry it, measure it, and document every reading room by room for your adjuster, so the repair that gets approved is the repair the floor actually needs.
Where the Water Came From
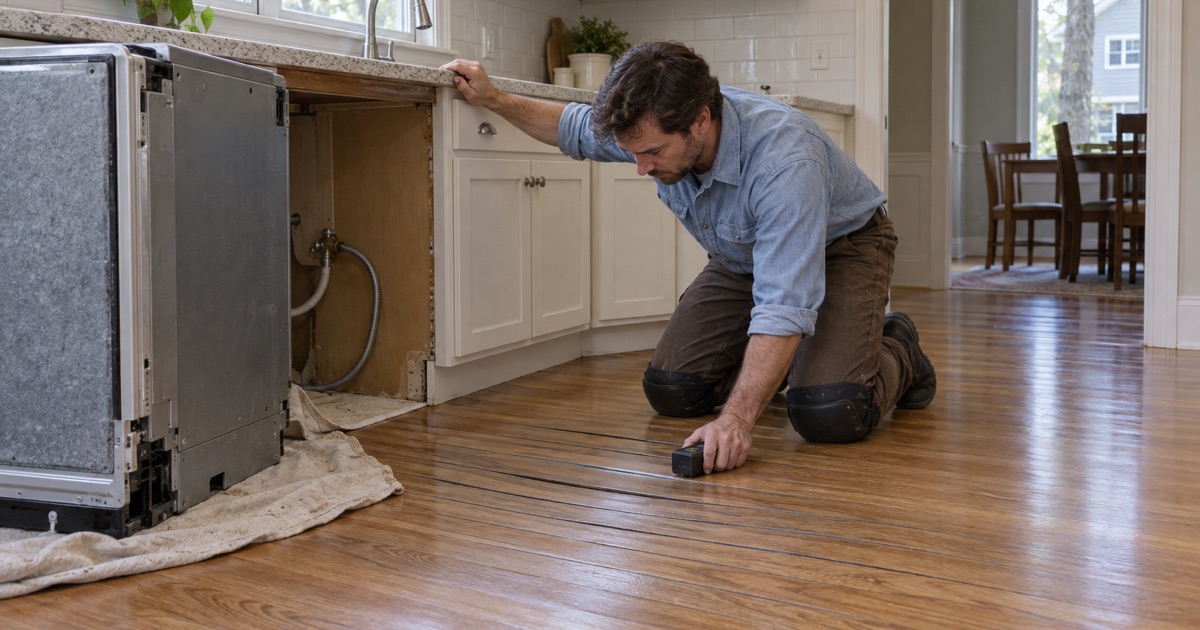
Washers, Dishwashers and Supply Lines
Appliance leaks are the most common source of water damage on wood floors. A slow drip under a dishwasher can soak the boards for weeks before anyone sees a stain, while a burst washer hose can flood a hallway in minutes.
The source decides the repair as much as the damage does. A leak that has been fixed leaves a floor that can be dried and measured; a leak still running will keep wetting any new board we lay. We confirm the plumbing has been repaired before any drying or replacement starts.
Storms, Doors and Exterior Water
Wind-driven rain under a door, a clogged gutter spilling against the foundation or water tracking in from a patio can each wet the floor from the edge inward. These leaks often repeat with every heavy storm until the exterior problem is fixed.
We look at where the damage starts and ends, which usually points to the source. If the cause is outside the house, we tell you so you can have it corrected before we repair the floor, rather than repairing it twice.
Crawlspaces and Hidden Moisture
Not all water damage comes from a single event. A damp crawlspace, a missing vapor retarder or poor drainage under the house can push moisture up into the subfloor slowly, causing cupping that appears every humid Georgia summer.
These floors need the moisture source dealt with first, sometimes with a vapor retarder on the crawlspace floor or a dehumidifier. Replacing boards without fixing what is below them only buys a season.
Reading the Damage
Cupping, Crowning and Buckling
Cupping means the edges of each board sit higher than the center, because the underside absorbed more moisture than the top. It is the classic sign of water from below, and it often reverses as the floor dries.
Crowning is the opposite shape, usually caused by sanding a cupped floor before it dried. Buckling is the most severe: boards lift off the subfloor entirely. Each needs a different response, which is why we name what we see before recommending anything.
Water Stains and Dark Boards
Water that sits on a finished floor can leave white marks in the finish, which often come out with a light sanding and recoat. Water that reaches the wood and stays can leave gray or black stains, especially on oak.
Black water stains usually run deep into the board and do not sand out. Those boards come out and matched ones are woven in, blended to the rest of the floor during finishing. On older red oak, where new stock looks too bright, we look for reclaimed boards so the repair does not stand out once the finish goes on.
Soft Spots and a Musty Smell
A soft spot or a musty smell after a leak can mean the subfloor stayed wet too long and has begun to rot or grow mold. The floor surface may look fine even when the wood underneath has failed.
We open the floor at those spots to see the subfloor and joists. Rotted subfloor is replaced, and suspected mold is referred for proper remediation before new wood goes down.
Drying and Measuring Before Repair
Moisture Meter Readings Room by Room
We take moisture meter readings across the damaged area and in a dry reference room, so the wet readings have something to compare against. Readings are repeated as the floor dries, and each one is recorded with its location.
Those records do two jobs. They tell us when the wood is ready to repair, and they give your adjuster a documented picture of how far the water went and how the floor responded.
Letting the Floor Settle
Once the wood and subfloor are back to normal, many cupped floors flatten on their own. We give them time to settle before deciding which boards need replacing, because boards removed too early are boards that might have been saved.
Where cupping remains after the floor is dry, the remaining boards can often be sanded flat without crowning. Doing that before the floor is dry is the mistake we see most often.
Documenting for the Adjuster
We photograph the damage, record the moisture readings, and write a room-by-room scope that separates boards to replace from areas to refinish. That scope is written for an adjuster to read, not just for us to work from.
What your policy covers is always the insurer’s decision. Our role is to make sure the evidence of the damage is clear, dated and complete. If the adjuster wants to meet on site, we can walk the floor with them and explain each reading and each board marked for replacement.
Our Step-by-Step Water Damage Repair Process
Step 1: Confirm the Source Is Fixed
We make sure the leak or entry point has been repaired, then map the wet area with a moisture meter, including the edges where the damage is not yet visible. Nothing is replaced while water can still reach the floor, because a new board laid over a live leak is simply the next board to fail.
Step 2: Dry and Measure
The floor is dried with airflow and dehumidification, and readings are repeated until the wood and subfloor return to the levels we measured in the dry reference room. Every reading is logged with its date and location, so the drying record can be handed to your adjuster as it stands.
Step 3: Replace What Stayed Damaged
Boards that remain cupped, stained, cracked or delaminated after drying are cut out and matched boards woven in with staggered joints. Any rotted subfloor under them is replaced first, and the new boards are fastened the same way as the original floor so the repair moves with the rest of the room.
Step 4: Sand, Blend and Finish
The repaired area or the whole room is sanded, color-blended with stain samples and finished. Where the damage reached several rooms, we plan the finish so the color runs evenly across the doorways. We walk you through the final result and the moisture records before we leave.
- 20+ Years on Wood Floors
- Moisture Readings Before Repairs
- Stain Samples on Your Floor